Liberty Reserve OK kok

Wednesday, December 31, 2008

Accessing Remote OPC Server (Windows XP SP2 Configuration)

When we want to access an OPC server installed on the other computer, we need some configuration to allow the operation. The configuration relatively different for each Operationg System (OS) and also for different product revision. For example, Windows XP SP2, Windows XP SP1, Windows 98, each of them has different configuration.

In this post, I write the configuration to allow an OPC client to acces OPC server by remote in Windows XP SP2.

OPC Product: DeviceXplorer, MatrikonOPC, KepServerEx

Here are:

1. Make sure PC server and PC client connected by ethernet connection (it doesn't matter weather we use cross or straight connection).

2. Make sure we use the same account and password on both PC.

3. Make these configuration on both PC server and PC client :

============================================================

DCOM security setting
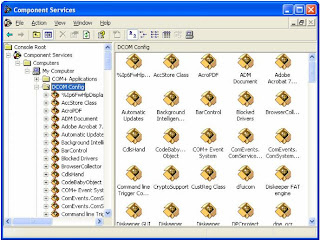
a. Open Component Services window
Go to Start->Run and then type "dcomcnfg"
b. On the component services window, go to Console Root->Component Services->Computers
c. Right click on the "My Computer" and select "Properties"
d. Go to Default Properties tab
e. On the Default Distribution COM Communication Properties frame, set "Connect" for Default Authentification Level and "Identity" for Default Impersonation Level.
f. Go to COM security tab.
g. On the "Access Permissions" and "Launch and Activation Permissions" frame click on "Edit Limits" and "Edit Default" button step by step. On each step, make sure these group or user name has been listed: "ANONYMOUS LOGON", "Everyone", "INTERACTIVE", "NETWORK", and "SYSTEM". Don't forget to check all checkbox on the "allow" side for each group or user name.
h. Go to Console Root->Component Services->Computers->My Computer->DCOM Config
i. Find the OPC server you want to access on list, right click on it, and then select "properties"
j. On the General tab, set the Authentication Level to "Connect"
k. Go to security tab.
l. Set "Customize" on both "launch and Activation Permissions" and "Access Permissions" frame, step by step click on both Edit button and make sure these group or user name has been added : "Everyone", "INTERACTIVE", "NETWORK", and "SYSTEM". Check all the checkbox on the "Allow" side for each group or user name.
m. Go to identity tab and then chack to the "The interactive user" radiobox.
n. Again, go to Console Root->Component Services->Computers->My Computer->DCOM Config
o. Find "OpcEnum", right click on it, and then select properties.
p. Do the same as j, k and l step above.Then go to identity tab and then chack to the "The system account (service only)" radiobox.
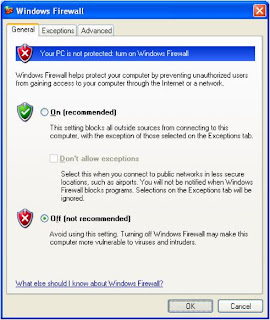
Windows Firewall

Turn off the Windows Firewall.
Control Panel->Windows Firewall, on the general tab, click on "Off (not recomended)" radiobox.
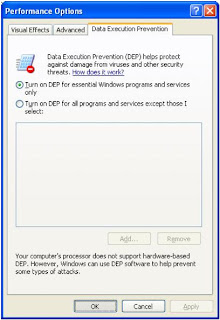


Data Execution Prevention

Go to system properties.
Control panel->System and then go to Advance tab. On the Performance frame, click on "Setting" button. Then go to Data Execution Prevention and make sure that on the "Turn on DEP for essential Windows programs and services only" radiobutton has been checked.


Local Security Policy
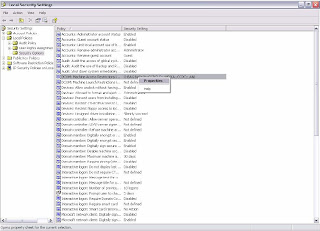

a. Control Panel->Administrative Tools->Local Security Policy
b. Go to Security Settings->Local Policies->Security Options
c. Find "DCOM: Machine Access Restrictions…", right click on it then select "properties".
d. Click on the "Edit Security ..." button
e. Make sure these group or user name : "Everyone", "INTERACTIVE", "NETWORK", and "SYSTEM" has been added. Check all the checkbox on the "Allow" side for each group or user name.
f. Find "DCOM: Machine Launch Restrictions…" right click on it, and then select "properties"
g. Do the same as step d and e.
h. Find "Network access: Let Everyone permissions apply to
anonymous users", right click on it, and then select "properties"
i. Select to the "Enable" radiocheck
j. Find "Network access: Sharing and security model for local accounts", right click on it, and then select "properties".
k. On the local security tab, select "Classics - local users authenticate as themselves"

============================================================

4. Try to access OPC server by remote

Run your OPC client software, fill node with the IP address of PC server (PC which OPC server has been installed) and then browse the OPC server list available on the remote PC server. The configuration successful if the OPC server can be listed from OPC client.


Monday, December 29, 2008

Google search result ...

ba_dank : Here are the result(s) ...


Thank your for Google searching through this site ...

PID Control : control tuning

The performance of a PID control loop depends on the following:
• The quality of the measuring and control devices.
• The effect of process upsets.
• The control stability as manifested in the ability of the measured variable to return to its set point after a disturbance (see figure 1). This ability is dependent on the correct controller PID settings, which is accomplished through good tuning.

typical-response-curves
figure 1


Tuning means finding the ideal combination of P, I, and D to provide the optimum performance for the loop under operating conditions. Keep in mind that “ideal control” must be determined for a specific application.

Loops can be tuned either for minimum area, minimum cycling, or minimum deviation (see figure 2).
• “Minimum area” produces a longer-lasting deviation from the set point. It is used for applications in which overshoot is detrimental (e.g., a defective product would result).
• “Minimum cycling” produces minimum disturbances with a minimum time duration. Applications with a number of loops in series benefit from this setup because it provides overall process stability.
• “Minimum deviation” maintains close control with small deviations and is the most commonly used. However, there is cycling around the set point. The amplitude should be kept at minimum.

different-control-stabilities
figure 2


Controller tuning is generally done automatically, manually, or through adjustments based on experience. In all cases, a few simple rules will minimize problems.
• Check with the operator before starting.
• Before retuning an existing controller, note the old settings (just in case you need to go back to them in a hurry).
• If you are on manual, and the process is steady, take note of the output signal to the valve (in case you need to go back to manual in a hurry).
• On cascade loops, tune the secondary controller first, with its set point in local mode.

Automatic Tuning

In automatic controller tuning, the software/hardware vendor has included a feature in the equipment to perform the tuning function.

Manual Tuning

Manual tuning is a combination of art, science, and experience. In addition, two elements are required for good tuning. First, a good understanding of the loop being tuned is required; second, lots of patience is essential, since some loops may take a long time to properly tune.

There are two basic methods for manual tuning: open loop and closed loop. Open loop tuning may be used to tune loops that have long delays such as analysis and temperature loops, and closed loop tuning may be used to tune fast loops such as flow, pressure, and level loops.

Open Loop
The open loop method (see figure 3) consists of the following steps:
• Putting the controller on manual (open loop)
• Making a step change to the output (X) (5 to 10%)
• Recording the resulting action (PV) from the feedback element
• Finding the reaction rate R (= B/A)
• Finding the unit reaction rate Ru (= R/X)
• Finding the effective lag L (time intercept)
• Setting the controller PID values
gain = 1.2 / (Ru x L)
integral = 0.5 / L in repeats/minute
derivative = (0.5) L in minutes

• Where only P and I values are required, the settings are

gain = 0.9 / (Ru x L)
integral = 0.3 / L in repeats/minute

• Testing and fine tuning, if required

open-loop-model
figure 3


Closed Loop
The Ziegler-Nichols closed loop method (see figure 4) consists of the following steps:
• Putting the process on auto control using “P only” mode (set I and D to minimum)
• Moving the controller set point 10 percent and holding until PV begins to move
• Returning the set point to its original value
• Adjusting gain until a stable continuous cycle is obtained (i.e., critical gain, Gc)
• Measuring period of cycle (Pc)
• Setting the controller PID values
gain = (0.6) Gc
integral = 2 / Pc in repeats/minute
derivative = (0.125) Pc in minutes

• Where only P and I values are required, the settings are
gain = (0.45) Gc
integral = 1.2 / Pc in repeats/minute

• Testing and fine tuning, if required

open-loop-model
figure 4


Reference : The Condensed Handbook of Measurement and Control


Friday, December 26, 2008

Nokia 7600 modem on Ubuntu 8.04 Hardy Heron via bluetooth

Detail of my device :

* Nokia 7600 Mobile phone
* GSM SIM Card : Indosat IM3

My Access Point Name (APN) : indosatgprs
My username : gprs
My Password : im3

* Notebook : Acer Aspire 4520, AMD Turion64 X2
* Usb Bluetooth Dongle : Apollyon
* Operating system : Linux Ubuntu 8.04 Hardy Heron

Here are the steps:

1. Make sure bluetooth has been activated on phone and set to discoverable.

2. Use Terminal to write a command line.

Applications -> Accessories -> Terminal

3. Install gnome-bluetooth and bluez-gnome ( optimal )

Type on terminal : sudo apt-get install gnome-bluetooth bluez-gnome

Here are the response :

--------------------------------------------------------------------------------------------------------

engineer@engineer-laptop:~$ sudo apt-get install gnome-bluetooth bluez-gnome
[sudo] password for engineer:
Reading package lists... Done
Building dependency tree
Reading state information... Done
gnome-bluetooth is already the newest version.
bluez-gnome is already the newest version.
0 upgraded, 0 newly installed, 0 to remove and 216 not upgraded.
engineer@engineer-laptop:~$


--------------------------------------------------------------------------------------------------------

4. Edit file /etc/bluetooth/hcid.conf

Type on terminal : sudo gedit /etc/bluetooth/hcid.conf
Change "security user;" to "security auto;"

This is the result after edited:

--------------------------------------------------------------------------------------------------------

#
# HCI daemon configuration file.
## HCId options
options {
# Automatically initialize new devices
autoinit yes;

# Security Manager mode
#   none - Security manager disabled
#   auto - Use local PIN for incoming connections
#   user - Always ask user for a PIN
#
security auto;

# Pairing mode
#   none  - Pairing disabled
#   multi - Allow pairing with already paired devices
#   once  - Pair once and deny successive attempts
pairing multi;

# Default PIN code for incoming connections
passkey "1234";
}

# Default settings for HCI devices
device {
# Local device name
#   %d - device id
#   %h - host name
name "%h-%d";

# Local device class
class 0x000100;

# Default packet type
#pkt_type DH1,DM1,HV1;

# Inquiry and Page scan
iscan enable; pscan enable;
discovto 0;

# Default link mode
#   none   - no specific policy
#   accept - always accept incoming connections
#   master - become master on incoming connections,
#            deny role switch on outgoing connections
lm accept;

# Default link policy
#   none    - no specific policy
#   rswitch - allow role switch
#   hold    - allow hold mode
#   sniff   - allow sniff mode
#   park    - allow park mode
lp rswitch,hold,sniff,park;

}

--------------------------------------------------------------------------------------------------------

save file, close gedit window and back to the terminal.

5. Restart bluetooth service

Type on terminal : sudo /etc/init.d/bluetooth restart

Here are the response :

--------------------------------------------------------------------------------------------------------

engineer@engineer-laptop:~$ sudo /etc/init.d/bluetooth restart
* Restarting bluetooth                                                  [ OK ]
engineer@engineer-laptop:~$


--------------------------------------------------------------------------------------------------------

6. Find the Nokia Modem MAC address.

Type on terminal : hcitool scan

Here are the response :

--------------------------------------------------------------------------------------------------------

engineer@engineer-laptop:~$ hcitool scan
Scanning ...
00:0E:6D:1B:C3:89    ba_dank~7600
engineer@engineer-laptop:~$


--------------------------------------------------------------------------------------------------------

See that my modem MAC address is 00:0E:6D:1B:C3:89 with device name is  ba_dank~7600

7. Find the dial-up channel of the modem.

Type on terminal : sdptool search DUN

Here are the response :

--------------------------------------------------------------------------------------------------------

engineer@engineer-laptop:~$ sdptool search DUN
Inquiring ...
Searching for DUN on 00:0E:6D:1B:C3:89 ...
Service Name: Dial-up networking
Service RecHandle: 0x10002
Service Class ID List:
"Dialup Networking" (0x1103)
"Generic Networking" (0x1201)
Protocol Descriptor List:
"L2CAP" (0x0100)
"RFCOMM" (0x0003)
Channel: 1
Language Base Attr List:
code_ISO639: 0x656e
encoding:    0x6a
base_offset: 0x100
Profile Descriptor List:
"Dialup Networking" (0x1103)
Version: 0x0100engineer@engineer-laptop:~$

--------------------------------------------------------------------------------------------------------

See that my modem is on channel 1

8. edit file /etc/bluetooth/rfcomm.conf

Type on terminal : sudo gedit /etc/bluetooth/rfcomm.conf
I type my device MAC address and my device channel.

See the result after edited.

--------------------------------------------------------------------------------------------------------

#
# RFCOMM configuration file.
#rfcomm0 {
# Automatically bind the device at startup
bind yes;

# Bluetooth address of the device
device 00:0E:6D:1B:C3:89;

# RFCOMM channel for the connection
channel    1;

# Description of the connection
comment "ba_dank 7600 Modem";
}

--------------------------------------------------------------------------------------------------------

save file, close gedit window and back to the terminal.

9. Activate rfcomm

Type on terminal : sudo rfcomm bind 0 <MAC Adress device> <Channel>
In my case i type : sudo rfcomm bind 0 00:0E:6D:1B:C3:89 1
(Remember my modem MAC address and channel)

Here are the response :

--------------------------------------------------------------------------------------------------------

engineer@engineer-laptop:~$ sudo rfcomm bind 0 00:0E:6D:1B:C3:89 1
engineer@engineer-laptop:~$

--------------------------------------------------------------------------------------------------------

10. edit file /etc/wvdial.conf

Type on terminal : sudo gedit /etc/wvdial.conf

My dialer name : indosat
My APN : indosatgprs
My Username : gprs
My Password : im3

Customize with yours ........

This is the result after edited:

--------------------------------------------------------------------------------------------------------

[Dialer indosat]
Modem = /dev/rfcomm0
Baud = 460800
Init1 = ATZ
Init2 = ATQ0 V1 E1 S0=0 &C1 &D2 +FCLASS=0
Init3 = AT+CGDCONT = 1,"IP","indosatgprs","",0,0
Modem Type = Analog Modem
ISDN = 0
Phone = *99#
Username = "gprs"
Password = "im3"

--------------------------------------------------------------------------------------------------------

save file, close gedit window and back to the terminal.

11. Connect and run the modem.

Type on terminal : wvdial <dialer name>
In my case I type : wvdial indosat

Here are the response (the response indicated a successfull connection to modem) :

--------------------------------------------------------------------------------------------------------

engineer@engineer-laptop:~$ wvdial indosat
--> WvDial: Internet dialer version 1.60
--> Cannot get information for serial port.
--> Initializing modem.
--> Sending: ATZ
ATZ
OK
--> Sending: ATQ0 V1 E1 S0=0 &C1 &D2 +FCLASS=0
ATQ0 V1 E1 S0=0 &C1 &D2 +FCLASS=0
OK
--> Sending: AT+CGDCONT = 1,"IP","indosatgprs","",0,0
AT+CGDCONT = 1,"IP","indosatgprs","",0,0
OK
--> Modem initialized.
--> Sending: ATDT*99#
--> Waiting for carrier.
ATDT*99#
CONNECT
~[7f]}#@!}!} } }2}#}$@#}!}$}%\}"}&} }*} } g}%~
--> Carrier detected.  Waiting for prompt.
~[7f]}#@!}!} } }2}#}$@#}!}$}%\}"}&} }*} } g}%~
--> PPP negotiation detected.
--> Starting pppd at Tue Jul  8 21:32:01 2008
--> Warning: Could not modify /etc/ppp/pap-secrets: Permission denied
--> --> PAP (Password Authentication Protocol) may be flaky.
--> Warning: Could not modify /etc/ppp/chap-secrets: Permission denied
--> --> CHAP (Challenge Handshake) may be flaky.
--> Pid of pppd: 6851
--> Using interface ppp0
--> pppd: [18]�[06][08]��[06][08]H�[06][08]
--> local  IP address 10.33.210.176
--> pppd: [18]�[06][08]��[06][08]H�[06][08]
--> remote IP address 10.6.6.6
--> pppd: [18]�[06][08]��[06][08]H�[06][08]
--> primary   DNS address 202.155.0.10
--> pppd: [18]�[06][08]��[06][08]H�[06][08]
--> secondary DNS address 202.155.0.15
--> pppd: [18]�[06][08]��[06][08]H�[06][08]
Caught signal 2:  Attempting to exit gracefully...
--> Terminating on signal 15
--> pppd: [18]�[06][08]��[06][08]H�[06][08]
--> Connect time 0.9 minutes.
--> pppd: [18]�[06][08]��[06][08]H�[06][08]


--------------------------------------------------------------------------------------------------------

Now you can try to run your internet browser and open a website ......

12. Disconnecting

Type on terminal : <Ctrl> C

Here is the response :

--------------------------------------------------------------------------------------------------------

...........

...........

--> Disconnecting at Tue Jul  8 21:33:01 2008

--------------------------------------------------------------------------------------------------------

13.  Connecting again with the same setting

Just Type on terminal : wvdial <dialer name>
In my case I type : wvdial indosat

14. And So on .....................

That's All ............

Get the success .... :)

detikInet